Welcome to the new Motivation Monday series from Not Just CAD!
Every Monday, I will post you a tip or trick you can use in AutoCAD, Revit, PlanGrid, and/or other CAD and BIM tools from Autodesk that will motivate you to do better on a dreary Monday back at work.
(NOTE: I know that this one is a day late too. I had to rush to help a family member who was in the ER overnight and trying to type a blog when driving at night on a motorway is hard to do. I may be good, but I’m not THAT good!)
So here goes…..Motivation Monday #003, via the M6 (motorway).
How many of you know that AutoCAD now supports 4K monitors? More to the point, you can now set up AutoCAD to function at its best optimal level for whatever type of graphics card you are using and, more importantly, what type of environment you work in; 2D, 3D or both.
Those of you that know me, also know that I use an Apple MacBook Pro for all my Autodesk work. You might say, how does he run all his Autodesk software without Microsoft Windows? Well, it has been said that the best way to run Windows is on a Mac, but it IS up to you where you operate your Windows from. I am just an Apple afficionado and I have been for some years.
The reason I mention Apple is that my current MacBook Pro is a 2018 model that runs an AMD Radeon Pro 560X graphics card. This is a laptop graphics card (known as a Graphics Processing Unit or GPU for short) and whilst it does the trick for most of my Autodesk work when I am travelling, I am also running a bigger PC based unit at home that houses an AMD WX 3200 GPU with a large amount of onboard RAM memory to cope with high level graphics loads. My WD 3200 works not only with AutoCAD, but Revit renders, and archviz apps such as Unity and Unreal Engine from Epic Games.
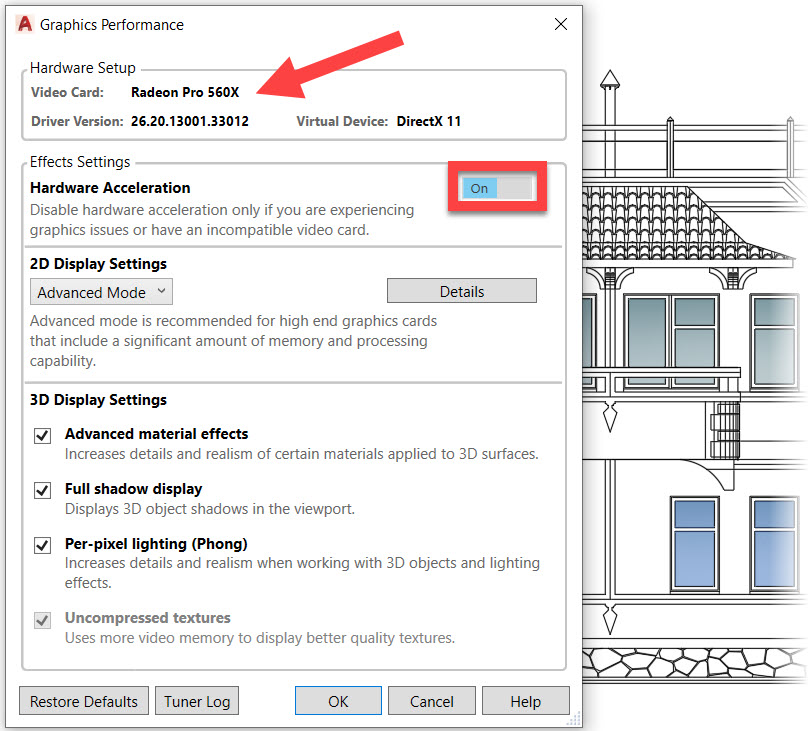
When you’re working in AutoCAD, it’s easy to set up your graphics settings based on whatever GPU you are using. All you need to do is type GRAPHICSCONFIG and press Enter. This will bring up the Graphics Performance dialog box and you will see the name of your graphics card at the top of the box, along with various settings that are available. Anything greyed out normally means that your graphics card and its drivers don’t support it.

You will notice that my Hardware Acceleration is ON. This is normally the best option, as it ensures that your GPU is being used by AutoCAD for all graphics operations. This then frees up your computer’s hardware to run all the things it normally does. The only time you might turn this off is when your GPU isn’t up to it. A typical example might be that you are running a graphics card that is integrated into your computer’s motherboard, and the graphics load is causing your computer to run slowly, or even crash. This is not a common problem much nowadays though as even motherboard graphics cards tend to be reasonably capable.
Going back to the dialog box. In 2D Display Settings, you can utilise one of the following; Basic Mode, Intermediate Mode and Advanced Mode. I am using Advanced Mode because my AMD Radeon Pro 560X allows me the functionality to utilise advanced tools for graphics in AutoCAD. If you select each option in the dropdown menu, you will see a description that will help you select which option to use. Basic Mode is great for a graphics card integrated into the motherboard (as mentioned above).
If you click on the Details button, more information displays in the dialog box. You will see that you can set your Smooth Line Display (on/off tick box) and Video Memory Caching Level (between 1 and 4).

You do not get the above options in Basic Mode, but they can be set in Intermediate Mode and Advanced Mode. Smooth Line Display is exactly that – on or off, but make sure your caching level is set to a level that your graphics card can cope with.
Below this in the dialog box, your 3D Display Settings are all used to make 3D work in AutoCAD easier. Again, though, make sure your settings are compatible.
So, there you go. GRAPHICSCONFIG, the condensed version.
It’s Monday (Tuesday). Be motivated. 😉
SCB.
PS – you might want to check out my LinkedIn Learning course on 2D and 3D elevations in AutoCAD with your newly discovered graphics settings! You can find it here.

