OK, so here we are for the second part of DVIEW with a TWist!
So, where were we? We had completed our DVIEW command and were considering how to save our UCS.
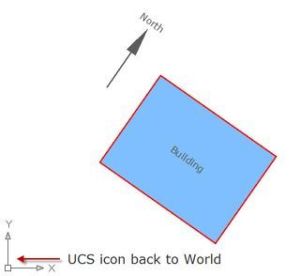
Now, we have our WCS back to normal (horizontal) and our UCS is set to World (as shown in the drawing to the right).
So, lets rotate our building and our north point.
We are going to use the Rotate/Reference command to rotate. But, before we do that we need to draw a reference line.
OK, I am going to hope that you all know where the LINE icon/command is, right? If you don’t, where have you been? LOL. 🙂
Draw a line from the lower right corner of the rectangle that represents the building and drag it to the LEFT horizontally. Use your Object Snaps and Polar Tracking for this and you’ll be fine. Have a look at the drawing below for a little bit of guidance. Put it on it’s own layer, UCS_LINE, so that you can freeze it or switch it off later. Always try and utilise your layers like this as it will help you out in the long-term. A good CAD habit to get in to!
Once you have drawn your UCS line, you need to use it to rotate your building and north point. Use the ROTATE command, either by clicking on the icon or using the keyboard. At the Select objects prompt, make sure you select the building, the north point AND the UCS line and press Enter to confirm your selection.
At the Select base point prompt, make sure you select the RIGHT hand end of your new UCS line (as shown to the left).
Then, you need to use the Reference option of the ROTATE command by right clicking and bring up the shortcut menu for the ROTATE command.
Click on Reference and you will be prompted to Specify the reference angle…
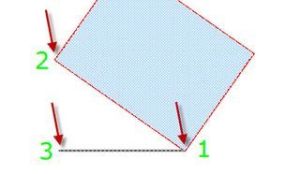
You MUST specify the points of the reference accurately and in the RIGHT order.
To avoid confusion, I have taken a screenshot of the drawing and highlighted the points in the correct order.
So, you have absolutely no excuse for getting it wrong! 🙂
The drawing is shown below. You can’t miss it. It is the one with the big numbers and the red arrows! LOL.
Once you have clicked on all 3 points, you will have a drawing that looks like the one below:-
We now need to save a UCS that rotates back to the original angle that the drawing was set to before we started all of this.
First of all to do that, we need to rotate our UCS to the same angle as the building is at now before we rotate the building to the horizontal.
Simply type UCS and press Enter. You will be prompted Specify origin of UCS or… at the command prompt (or on the screen if you have Dynamic Input switched on as I have in my case).
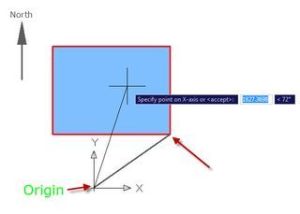
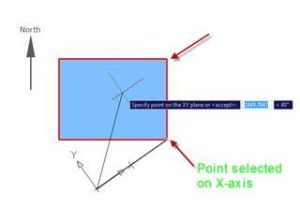
When that prompt appears, you need to specify the origin of your new UCS and then click on a point on the X-axis, followed by a point on the XY plane. The new origin of the new UCS will be the LEFT hand end of your UCS line and your point on the X-axis will be the RIGHT hand end of your UCS line. Your point on the XY plane can be any point on your building. It doesn’t matter which one.
Let’s break that down in to easy steps….
Select your new UCS origin (LEFT hand end, remember?).
Then, click on the RIGHT hand end of the UCS line for the point on the X-axis at the Specify point on X-axis or <accept>…</accept> prompt.
You are then prompted for a point on the XY plane. I would pick a point on the building. Any corner is fine.
Once you have clicked on a point on the XY plane, you will see your new rotated UCS origin on the end of your UCS line and your crosshairs will be following that new UCS, as shown below: –
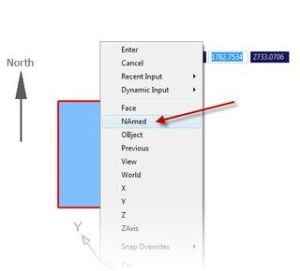
The new UCS now needs to be saved. This is the easy bit! Simply type UCS and press Enter. Then right click to bring up the shortcut menu. Select NAmed on the shortcut menu as shown below: –
Select Save on the on-screen menu that appears and give your new UCS a name such as UCS-Original, for example.
Your new UCS is now saved and if you ever need to go back to it, use the same process but select Restore from the on-screen menu that you just used and type in the name of the UCS you need. Easy!
OK, last but not least. We now need to get back to our UCS World settings so that we are all horizontal how we want to be.
Again, just type in UCS and press Enter. Right click for the shortcut menu and this time select the World option on the shortcut menu to get back to the correct WCS we set up in part one of this Quick Tip.
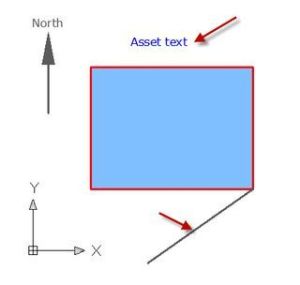
So, we should now have a TOTALLY horizontal drawing, north point pointing upwards (in this case, as it could vary), a building that is horizontal but, more importantly, asset text (or any text for that matter) that comes in on the WCS horizontallyas shown below. You can now freeze or turn off your UCS line layer so that your UCS reference line isn’t shown on the drawing.
So now you know how to resolve those drawings that you get in from a third party or a client where the UCS just seems to be completely crazy! As I said earlier, you just need to be aware of what your WCS and your current UCS are doing. Once you have that clear, you will be fine!
That finishes this long-winded Quick Tip (maybe I should have a set of Slow Tips – let me know!). I sincerely hope that you have learnt something useful here and I am more than happy to ship you over the original drawing that is set up to go from the beginning of part one.
Happy UCS’ing!
SCB

