

I thought I better start blogging again. Just in case you all thought I had disappeared off the face of the earth or something! Nope, still here, just too much going on sometimes!
Anyway, you are here for a Quick Tip on AutoCAD so here it is. Just so that you know, I am using AutoCAD 2010 for this one.
This Quick Tip is quite detailed (and not a Quick Tip at all really!) but I have broken it down in to two parts so tune in next week for the second part, OK?
I was training some really nice people on Friday from a very well known sports venue in London, UK that were receiving drawings from an architect where the User Coordinate System (UCS) was all over the place. Now these drawings were going to be linked to a Computer Aided Facilities Management (CAFM) tool and because the World Coordinate System (WCS) had been changed to a different angle, the asset text in the CAFM tool was always coming out at the wrong angle, as well as regular AutoCAD text.
So, let’s look at what the original screen looked like (NB: I have not shown any of their data for obvious reasons. I have replaced their building with a solid filled rectangle): –
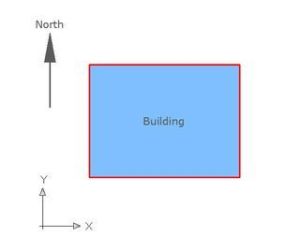
Now, architects love their north points, so I have shown how the drawing was laid out when I first opened it. It all looks OK. The UCS looks fine and everything looks pretty horizontal to me. Wrong. The horizonal view is artifical and caused by a rotated UCS aligned with a WCS that has been rotated by the DVIEW / TWist command.
CAFM tools often use the AutoCAD WCS to align FM asset text linked to their FM database so the asset text was always coming out skewed regardless of how tickety-boo the drawing on the right actually looks!
The drawing on the right has had the UCS aligned with the building so that it all looks level once the drawing had been completed (before linking to the CAFM tool).
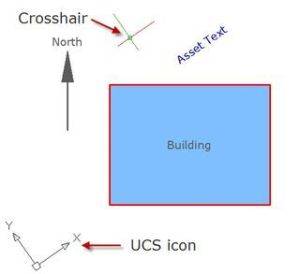
However, upon linking any asset text, it ended up looking like it does in the screenshot of the drawing below: –

Notice I have not shown the UCS this time. That is just to avoid confusion. So, we now have a drawing that has original text aligned with a rotated UCS based on a skewed WCS, where the skewed WCS is causing the aseet text to appear in a way that we don’t want it to. So, how do we fix the WCS so that the asset text comes out horizontal?
It isn’t that hard. you just need to be spatially aware of the WCS and the UCS.
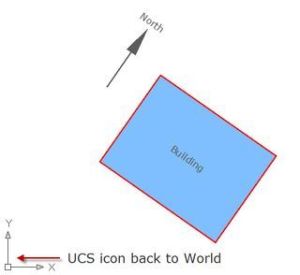
All you need to do is set the UCS to World (just type UCS, press Enter, then W followed by Enter. Watch what happens to the UCS icon and the crosshair.
You will then see what I mean about a skewed WCS when you look at the next drawing I have shown below. I have included the UCS and the crosshair this time to clarify my point. So, even though the building and the north point look nicely aligned to the horizontal, they are not. This often happens when you receive a drawing from a third party. They have left settings in place that you don’t know about and, hence, chaos reigns!
So, how do we fix this and get our WCS back to the default and get our building level to the horizontal? Also, bearing in mind that we are not worried about the orientation of the building to north because our FM drawing is purely a method to portray FM data. North points don’t really count in this instance.
Well, we have a list of things to do; 1. Get our WCS horizontal….2. Rotate the building in the drawing….3. Save a skewed UCS to replicate the original skewed WCS.
Let’s look at getting our WCS horizontal first then. To do that we must use the DVIEW command.
Type in the command DVIEW and press Enter. Then, right click to bring up the shortcut menu and select the TWist option. At the selction option, type All and press Enter as we need to select everything in Model [ you are in Modelspace, right? 🙂 ]. Press Enter again to confirm. You will then be prompted for the twist angle. This angle is absolute, not relative, so we need to go back to the default zero for the horizontal angle so type in 0 and press Enter. Press Enter again to confirm. You will now see what I have shown in the drawing below.
So, now we have a true WCS set to horizontal and the UCS icon shows us that. But, we now have a building and a north point that need to be rotated, plus we still need to set a saved UCS.
As the building is at the angle we need to save the UCS to, we can cheat a little and use the UCS/Object option before we rotate the building and the north point.
Once we have done that we can save the UCS as a named UCS for future reference if we need it.
I’ll teach you how to do that in the second part of this rather long-winded AutoCAD Quick Tip!
I am more than happy to provide you with the drawing I have used for this Quick Tip so that you can get to this point before going on to the second part.
Please feel free to send me an email asking for the drawing. I’ll get it emailed over to you as soon as I can! My email address is shaun.bryant@cadfmconsult.co.uk.
Happy DVIEW’ing!
SCB