

Level: REGULAR USER/INTERMEDIATE
OK, so here we are for Part 2 of Measuring Areas in AutoCAD 2012.
What I am going to show you is how to use the AREA command in AutoCAD and the good thing is that we already have polylines that have an area so there is no need to trace around the edges of rooms in the AREA command.
Always try and use polylines (POLYLINE) when drawing your floor and room areas. It is so much easier to work with and manipulate a polyline rather than a group of regular AutoCAD lines. Plus, you have the added advantage that polylines retain their area as xData, as mentioned in Part 1.
Section 1 – Calculating A Basic Floor Area
So, let’s do the easy one first. Our floor area. The drawing is very simple and we have one rectangular polyline (in green) representing our floor area.
Now here’s a neat trick. Do you know about the AutoCAD ISOLATE command? If you don’t, where have you been? A great tool for space management that allows you to isolate just the polyline you are working with at the time.
You can just see the green floor polyline on the drawing between the two red room polylines. Select it and then right click. You will see Isolate on the shortcut menu. Select it and then click on Isolate Objects as shown.

You will then see that the only object displayed is your green floor polyline. I must ask you at this time not to panic. All of your other AutoCAD objects are still there! All you have done is ISOLATE your floor polyline from them. A bit like a layer freeze, you might say, but without the hassle of knowing all the layer names. Cool, eh?

So, with your green floor polyline now isolated, you can use the AREA command to calculate its area. Now, at this point, your areas will display in metric millimetres as that is what I have used in this drawing, so the area numbers will look huge. Don’t worry. I am purely showing you how to calculate an area of a polyline right now. We will get to units and how to display them in a later part of this Quick Tip.
In AutoCAD 2012, you will see on the Home tab on the ribbon that there is a Utilities panel. Click on Measure as shown and select the Area command.

In this instance, our area is a one-off (i.e. only one object to measure the area of), so all we need to do is right-click and select the Object option.

Using the pickbox, select your green floor polyline. Lo and behold, the area (in square millimetres) will be displayed. You will also see that your polyline area has been highlighted in a paler green colour.
Notice the perimeter of the green floor polyline (in millimetres), plus the other MEASURE tools and an option to eXit (you can also type X and press Enter to exit).

You can now exit the AREA command. You will now be left with your green floor polyline. Select it and right-click.
Select the ISOLATE option on the shortcut menu again and select End Object Isolation.

You will now be returned back to normality with all your AutoCAD objects displayed.

Section 2 – Calculating The Room Area
OK, so a floor area was pretty easy to calculate, right (albeit in square millimetres at the moment)?.
So, the next step is to calculate the areas of each room and add them together. Now you are thinking easy. I just do what I did in Section 1 and multiply it by two as the rooms are the same size. Nice idea, but what happens if the rooms are irregular sizes and shapes?
This is where using polylines and using the AREA command come in to their own as you can ADD areas together. Nice.
Yes, they will still be in square millimetres right now, but we will deal with that later.
Go back to the Utilities panel on the Home tab on the ribbon and select Area again.

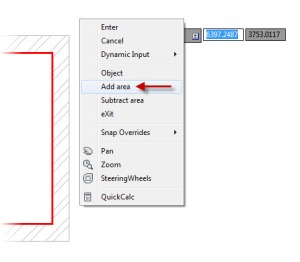
So, we are back in the AREA command again, then right-click. This time select the Add Area option.
Then, right-click again. Select the Object option (as per Section 1) as we will be selecting both our red room polylines this time.
Using the pickbox, click on both red room polylines.
You will notice that I did not use ISOLATE this time. It is because I really didn’t need to as there are plenty of points on the red room polylines to select when calculating their area. If the drawing was much busier, sure, use the ISOLATE command!
With both polylines selected, they will both be highlighted. You will notice the areas getting added on the command line.

Press Enter and you will see the last area selected and the total area displayed.

Press Enter again and you are back to the onscreen menu where you can eXit like you did in Section 1.

At any point, you can press F2 on your keyboard. This will display your AutoCAD Text Window where you can look at your history of area calculations, as shown below.

So, now you know how to utilise the Measure tools on AutoCAD 2012, especially the AREA command. As you can see, it is very easy to work with areas providing you have used closed polylines for your floor and room areas.
In Part 3, we will move towards highlighting and annotating our floor and room areas.
As I mentioned in Part 1, please email me at shaun.bryant@cadfmconsult.co.uk if you need the AutoCAD DWGs (in 2010 DWG format) to work through the Quick Tip.
In the meantime, happy CADD’ing!
SB
Waoh! This is beautiful. I am a Nigerian and a USA certified cost engineer. Just resumed a new job in the middle east but had no knowledge of AutoCAD. With what I have seen thus far here, I am made. My worries are gone.
Pingback: Terrific Tuesday #002 | AutoCAD Quick Tip – Measuring Areas – Part 4 – CADFMconsultants