
Welcome to the Motivation Monday series from Not Just CAD!
Every Monday, I will post you a tip or trick you can use in AutoCAD, Revit, PlanGrid, and/or other CAD and BIM tools from Autodesk that will motivate you to do better on a VERY windy Monday back at work (Storm Ciara is still blowing strong here!).
So here goes….Motivation Monday #002.
I may be teaching some of you experienced Revit users out there how to suck eggs with this one, but it’s a very typical question I get asked when classroom training for beginners not used to Revit. The question is, “How do I set my object snaps?”
Revit DOES have object snaps, and often, Revit users (especially beginners) don’t know they exist and can be toggled on or off, just like object snaps in AutoCAD can be. They are, however, subtly different to AutoCAD object snaps but perform in a similar fashion. Often, Revit users who are just starting out just use the default snaps without thinking that there might be a way to change the object snap settings.
A typical Revit object snap is shown below, where I am drawing a wall in a floor plan and the Endpoint object snap is displayed.

I would then click to accept the object snap and off I would go, inserting my wall into the Revit model, using the Properties palette to define the wall properties.
But here’s the kicker. You CAN toggle which snaps you want to use and you CAN use keyboard shortcuts mid-command to define WHICH snap(s) you want to use as well.
If I wanted to only use the Midpoint snap to place my wall, I would type the keyboard shortcut SM after starting the Wall command. Revit would then only select Midpoint snaps to place my new wall in my floor plan.

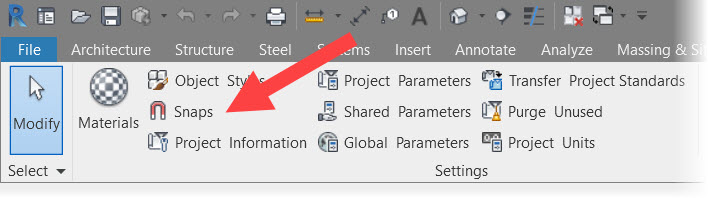
You will find your Snaps in Revit on the Manage tab on the Revit ribbon on the Settings panel.

Simply click on Snaps and you will bring up the Snaps dialog box, where all your Snaps settings can be configured in Revit, and all the object snap keyboard shortcuts are also displayed.

Here’s a good tip for you. Take a screenshot of the Snaps dialog box and put it somewhere you can see it. You will then have a quick keyboard shortcut guide for your Revit object snaps to hand whenever you need it. You’ll find with time that you’ll remember most of the snaps you need on a day-to-day basis.
If you need to set everything back to defaults, just use the Restore Defaults button in the dialog box!
It’s Monday. Be motivated. 😉
SCB.
(PS – Check out how to become a Revit Autodesk Certified Professional (ACP) here in the LinkedIn Learning library!)